-- Badtux the Auto Penguin

Kraut Cup Trial '13
13 years ago
-- Badtux the Auto Penguin
I'm going to eventually put a long-arm suspension system and some big-ass tires on the beasty, but that'll wait until it's paid off. Until then, its current configuration -- a Jeep on the cheap -- does everything I need, if not necessarily everything that I want.
-- Badtux the Jeeping Penguin
If I could rely on someone else to be as meticulous as me, I think it'd be worth it for me to pay someone. Problem is how to find someone as meticulous as I am who is educable as to the quirks of my Jeep (as vs. the sort who go, "I've been working on cars for 99 years, I know what I'm doing", well, okay, but the cars you were working on don't have the mods of my Jeep, which has a few more zerk fittings than a standard Jeep as well as that trick front differential with the ratchet in it!). Well, that and being able to afford that person, since you ain't gettin' that for cheap!
- Badtux the Wrenching Penguin
(Who still ain't done, I need to grease the zerks and inspect the brake pads, oh joy!).
So what's the deal, then? Well, the deal is simple: HEALTH CARE. General Motors turned into a health care provider that sold cars. There is more health care than steel in a GM car, on a dollars and cents basis. The cost of providing health coverage for 1.1 million GM workers, retirees and dependents is over $10 billion per year. So we can say to GM, "okay, you can go bankrupt". But then 1.1 million people lose their health care coverage. Hundreds of thousands lose their pensions. Probably half a million Americans who are paid directly or indirectly by General Motors lose their jobs, as the failure reverberates through GM's suppliers, most of whom themselves would end up going bankrupt.
So while there's something to say about the notion "GM should not survive", this isn't the time. A down economy such as we have now simply can't take that sort of hit without going further into the hole. In the long term, we need to fix the health care system to take that burden off of GM's back and then do something about GM's management, which has not done a good job of thinking long-term over the past thirty years. But in the short term, unless something is done quickly GM is dead. And we get another half a million people without jobs on the street, and 1.1 million people with no health care. That's called "economic death spiral", folks. And no matter how much you detest GM, we can afford that even less than a bailout of GM.
-- Badtux the Economics Penguin
-- Badtux the Wrenching Penguin
So today I got to ride the new windshield and... meh. We'll have to see what happens once my mirror extenders come in and I can get the mirrors out of the way so I can tilt it back further, but so far, it doesn't seem to be much better than the stock windshield. At least it's not too tall, which was Gordon's fear -- the way I had it adjusted put the top of the windshield basically at the bottom of my visor. I've adjusted it a little taller for the ride home, we'll see if that's any better, but I don't think it'll be "right" until I can tilt it back further towards me, which I can't do until I move the mirrors out of the way. Alas, I forgot my camera, so couldn't get a picture of the bike w/windshield installed on it today... oh well!
-- Badtux the Wrenchin' Penguin
Funny how this works. All I wanted was a better windshield, and now I'm doing all this other stuff? WTF? Heh. These beasts always seem to work like that...
So anyhow, I'll test the windshield tomorrow, assuming it's not raining. My trip to the Mojave Desert on the V-Strom showed that the windshield was one of the two weaknesses left in the bike -- the other one being lack of a throttle lock or cruise control, which resulted in my right hand getting somewhat tired. Hopefully I'll get this all sorted out soon and have the bike really dialed in. It's close -- really close. But not there yet.
-- Badtux the Wrenchin' Penguin
First Cary, now this. I think it's time to put an armed mortar shell facing backwards on a stalk on my KLR so that if any son-of-a-bitch hits me, he gets his ass blown to the next kingdom at the same time I get mine sent onward. Fucking bastards. Too fucking busy talking on their goddamned cell phones about nothing important to watch where the fuck they're going...
-- Badtux the Targetted Motorcyclin' Penguin
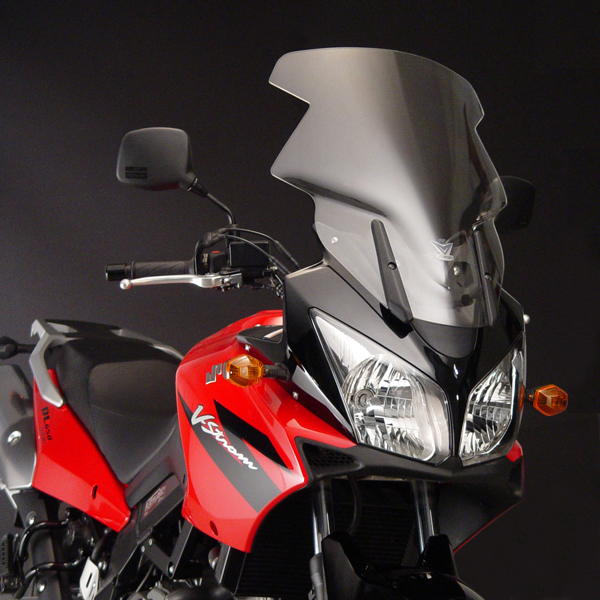 That is the National Cycle VStream. The weird cut-outs are to make room for the mirrors and the handguards on bikes that don't have bar-backs like mine, otherwise the windshield is too wide for the bike. The cut-outs also help with reducing buffeting behind the windshield, since the air coming around the cut-outs helps reduce the backpressure behind the shield.
We'll have to see what happens. This windshield was at least $80 cheaper than the other high-end windshield I was looking at, so hopefully it'll work. Otherwise I'll have to sell it off on Fleabay and fork out more money, bummer :-(.
-- Badtux the Motorcyclin' Penguin
 Cary Aspy was the creator of the 685 and 705cc overbore kits and "Big Valve" modification for the Kawasaki KLR-650 at Schnitz Racing. That was what he did when he felt like riding in the slow lane, which was when not building race engines for some of the quickest motorcycles in history. He built complete race engines from superstock, to nitrous injected and turbocharged. He hand ported every cylinder head and fit every piston.
Cary was truly dedicated to what he loved... spending 7 days a week at the shop when he wasn't enjoying a ride or weekend trip. He was involved in a fatal motorcycle accident Monday evening when a SUV hit him while he was riding his KLR on his way home from a weekend riding trip to Tennessee.
Dangerous hobby, we motorcyclists have. I was thinking about buying one of his 685cc kits for my KLR, which is getting a bit tired in the engine department. Now... I guess not :-(.
-- Badtux the Saddened Penguin
The time to do this shit is before you need it. So have you changed your blades within the past six months? No? What the f*** you waitin' for?!
-- Badtux the Wrenchin' Penguin
I am using the el-cheapo Symtec motorcycle grip heaters with the round (not toggle) switch. It goes well into the Rick's Shelf that I bought previously for the Wee-strom. So right now my status is that I've put the heated grips on, but I need to hook up the electrical circuit before I can put everything back together. Hopefully I'll be able to do that tomorrow night, so I can get to commuting on the Suzuki V-Strom 650 again!
-- Badtux the Wrenchin' Penguin
-- Badtux the Bloggered Penguin
The first thing I had to do was find a place to put the reservoir. Finally I noticed that there was a plastic trim poprivet (the kind you push the center in to remove, then pop the center back out to re-insert, that holds two plastic trim pieces together) right beneath the rear left fender where an exhaust pipe might be if the Blackstrom had dual exhausts. I popped it out and looked at the mounting bracket for the reservoir and yep, the reservoir's mounting stud was almost exactly the same size as that hole. A couple of washers later, and the reservoir was mounted. Most people mount it inside the rear left fender rather than hanging under it, but I like it outside so I can glance at it to see if it needs filling and fill it up without taking the seat off. Besides, to put it inside the rear left fender I would have needed to take the plastics off, and that would have required taking the rear luggage rack off, which is a PITA...
The next thing was to route the vacuum line. The Scottoiler uses engine vacuum to open a plunger to let oil drip out onto the chain. That keeps all your chain oil from dripping out when the bike is off. I had to glue one guide onto the plastics in order to keep the vacuum line from flopping into the wheelwell. Oh well. It's hidden up under the fender, and from there the vacuum line goes through an already-existing hole in the plastics and forward to the forward throttle body, where it plugs into the throttle body sync port (previously covered with a vacuum cap) using the adapter in the kit. At some point in time I need to re-plumb this port with a "T" so you don't have to pull off the Scottoiler vacuum hose to sync the throttle bodies, but this is okay for now.
The last and final thing to do was to route the oil line. I routed it basically down the rear subframe member until reaching a point where I could hop it down to the swingarm, then of course to the side of the swingarm, then down underneath it until I could bend the nozzle so that the tip was just above the chain at the sprocket.
Once all that was done, I could prime it. I use GM Dexron III ATF as my chain lube in my Scottoiler on my KLR, so in the interests of keeping a common lube, I primed this Scottoiler with ATF also. Unlike the weird "Scott-oil", Dexron III is available for cheap at every Wally World and roadside Kwicky-mart in the USA, so it makes more sense to put ATF in the chain oiler if you intend to take long trips, as I do. So I shoved fluid into it using the sealed priming intake port until nice pink fluid started dripping onto the chain, then popped the cap and finished filling up the reservoir with ATF.
Tomorrow I'll need to calibrate the thing to have the correct number of drops per minute. It doesn't take much, I don't intend to ride this bike through the dirt so I just need enough slow drip drip drip to keep the chain o-rings moist and conditioned and keep the chain from rusting. Any more than that and it just makes a friggin' mess. But in case it's raining or I do go through the dirt or something, all I have to do is turn the dial turn make it drip faster, and there we go. A mess on the back of my bike is better than having a rusty chain, after all...
-- Badtux the Motorcyclin' Penguin
 In case you don't remember what the original bumper looked like, here's the original bumper right after I got the new tires, before I took the Jeep out and got it dirty:
 You'll note that there's no tow hook on this setup like there was on the old setup, but I bought a tow hook that fits in the receiver from Cheap Chinese Tool Company. The old tow hook is beat to hell anyhow, it spent more time grinding itself against the rocks than anything else, because it hung down well below the bumper.
I also added a trailer wiring kit by Draw-Tite. It was completely plug-and-play, and gives me a flat four-wire connector that you can plug e.g. a U-Haul trailer plug into. Given that the Jeep's OEM lights are trailer lights (heh!), you can see why a plug-and-play trailer light kit was so easy to make for the Wrangler...
-- Badtux the Wrenchin' Penguin
Another thing I wanted was a socket on the side that I could power a heated vest with. A Powerlet socket seemed just the thing for both, since it had positive retention for a heated vest jack, but there is an adaptor to plug a cigarette-lighter-driven airpump into it. So I headed off to Easter Beaver and got the V-Strom rear electrical outlet kit. And here it is:

The first thing I did was put the bracket on. Here is the bracket(note: click on any picture to embiggen):
 The bracket fits behind the footpeg mount. There is also a washer/spacer (in the little baggie with the fuses in the first photo) that goes under the other footpeg mount bolt to space it out equally. The bolts were locked on with threadlocker, as is usual for this bike (Suzuki apparently got tired of bolts rattling loose so threadlocks *everything*), but unlike some bolts I didn't need to pull out the butane torch and heat these up to get'em out, the threadlock compound let loose fairly easily. So:

And now that the bracket is installed, now I put the socket through the hole in the bracket, with the spacers, washers, and nuts in the order specified on a sheet of paper inside the little baggie. Once the socket was tight in the bracket, I inserted the rubber boot over the end of the wires, and then shoved the connector ends into the empty socket where they belonged, and plugged in the connectors to connect it to the wire to be run to the fuse panel. Then I ran all the wires up behind the side panel to the vicinity of the battery. Here is where we are at this stage:

Now, I have an auxiliary fuse panel, previously installed (sorry that I never finished talking about that, but I'm not quite satisfied with my installation yet, oh well!). So now it was time to hook the wires up. Always pull the main fuse to whatever fuse panel you're working with, or if there is no main fuse, disconnect the ground wire from the battery. In this case, I pulled my 30 amp main fuse for the auxiliary panel, then ran the new wires to the auxiliary panel, cut them to length, stripped, and inserted into the connectors on the fuse panel. Here is the result, before I put the cover back on the auxiliary panel. The new wire is the one hooked to the 15A circuit, which is a permanently-on circuit (this being a Centech AP2, where the first three circuits are switched and the two nearest the front are permanently-on). I hooked it to a permanently-on circuit because I don't want to have to start the bike to pump up the tires.
 Before I put the cover back on the Centech, I temporarily replaced the 30A main fuse, and tested the socket by, err, plugging the Powerlet-to-cigarette-lighter adaptor in then the air pump, and turning on the air pump. It worked! So then I took the 30A fuse back out, and put the cover back on the Centech. Here is the final result:
 The new wires go through the grommet into the underseat compartment, and you can see the empty main fuse holder towards the left of the photo near the negative pole of the battery. Behind that is the relay for the Centech AP2 so that the first three circuits will be on only when the ignition is on, this was another Eastern Beaver kit, it plug-and-plays once you find room for it, no cutting of the OEM wiring harness required. The three fuse holders immediately to the right of the relay (as we look at this photo) used to be spaced along the backside of the battery compartment on three molded-in pegs, but I cut the pegs off and shoved them over to the side to make room for the Centech relay.
And anyhow, that's the end of the story. Hopefully I'll get back to providing a tutorial on electrical work, but it's hard work, and I've been very busy recently due to a project at work. If you have any questions, just ask!
Thanks,
- Badtux the Electrifyin' Penguin
 If part A (end inside the differential) is no longer on the same physical plane as part B (end outside the differential) because, duh, the axle broke, here is what happens:
 Is it a little clearer, now, why Jeepers hate Dana 35 (or any C-clip) axles?
-- Badtux the Jeepin' Penguin
-- Badtux the Literatary Penguin
| Two Ravens | |
|---|---|
 |
 |
-- Badtux the Ridin' Penguin
 Yes, that is literally a nickel and dime stuck in the ratchet mechanism for the recliner mechanism. Once I removed all the coins that were jammed in the mechanism, it worked fine.
I guess point of the thing is:
-- Badtux the Wrenchin' Penguin
This is just plain nuts. Less than 3% of the vehicles sold every year in the United States are motorcycles. Yet I can find better online services for my motorcycles than for my Jeep?
But maybe I'm just not looking in the right places. What do you think?
-- Badtux the Baffled Penguin
Watch near the end. A guy slides down and whacks into the barrier. He falls, and just as he hits the ground, a 400 pound motorcycle flies right over him and slams mostly through the barrier. The guy gets up and runs like hell to get out of the way of any other flying motorcycles that may be coming. Makes me glad that penguins don't race motorcycles...
Also: Be sure to tighten your front axle nut, people:
-- Badtux the Flightless Penguin
So anyhow, it's getting close to the time where I should change it anyhow (I have 22,000 miles on the Jeep, I should change it at 24,000 miles because it's a limited-slip Dana 44 and the plates wear and there's no oil filter so the only way to get that crap out of the differential is to dump the fluid every 12,000 miles) so tonight I took the bikes out of the garage and parked them beside the apartment building, and backed the Jeep into the garage. Now, one reason why I didn't do so well on the rear axle last time was because the rear axle is partially hidden by the gas tank skid plate. So this time, I stuck the Hi-Lift farm jack on the back bumper of the Jeep and jacked it up a little. Not enough to get the wheels off the ground, just enough to lift up the body of the Jeep so that the rear axle wasn't buried so deep by the gas tank. Boy, I'm glad my Jeep has a nice sturdy steel bumper instead of that plastic bullshit on the modern vehicles!
So anyhow, I just popped the differential cover bolts off, whacked the cover a few times with a rubber mallet to get the old RTV to let loose so I could pull it off, and let the fluid drain into the drain pan beneath it. Then I cleaned everything off with a gasket scraper, then brake cleaner (ooh! ether! whoooo!), and put a bead of black RTV around the cover and slapped that sucker back on and torqued the bolts to 30 ft/lbs. So now I'm waiting an hour for the RTV to dry, then I'm going to head back down and put in the differential fluid -- Royal Purple 75W140 synthetic, in case you're wondering (that's the recommended viscosity for this differential when used for off-road duty, and Royal Purple comes with the limited slip additive already included).
Next up, I get to take it to the dealership for a warranty repair on the seat, which seems to have a broken recliner mechanism... grrrr!
-- Badtux the Jeepin' Penguin
-- Badtux the Electrifying Penguin
I've been taking photographs, and hopefully will get some posted and online shortly. But it's late and I'm tired, so I'm going to bed.
-- Badtux the Electrifying Penguin
But courtesy of Gizmodo, there is a solution. Just take your lightweight Yamaha XT220 trail bike with you and *fly* in to those areas! Yeah the dirt strips in Death Valley are kinda a pain, but hey, it's better than spending 9 hours riding only to end up with a too-big bike once you get there, right?
Of course, the other possibility is to just hitch a trailer behind your car and haul your trail bike behind you. That's a little more affordable for this flightless waterfowl, as well as a bit safer than flying a light airplane into a dirt strip, heh!
-- Badtux the Flightless Penguin
That decision made, I took some stick-on plastic hooks and moved the ABS fuses and ABS relay to a more compact configuration. They were originally hooked via rubber slots to tabs on a piece of plastic attached to the battery tray. I cut off that plastic extrusion of the battery tray and moved them back to the front side of the owner's manual tray, more to the left. This leaves me room to put the fuse panel relay alongside them in the space to the right of them.
So anyhow, I'm going to stick the fuse panel into the tray with velcro, rather than screws. That way I can more easily lift it when I want to screw new wires into it (otherwise it's damnably hard for my beady little penguin eyes to get a wire into the correct location on the panel). I ran out of velcro so I'm going to need to run to Radio Shack this afternoon and get some. I am taking photographs of everything I am doing, and will post a nice big summary when I'm done. Just remember that what you will see there leaves out all the mis-steps and false starts that thus far have characterized this project, heh :-).
-- Badtux the Electrifying Penguin
Jap bikes have their own quirks, but they don't send their wheels in random directions, and their sidestands generally don't just collapse underneath you (another quirk of these BMW's -- flimsy sidestands, probably because for many years BMW motorcycles didn't have sidestands at all, just centerstands). German "engineering". Bah humbug!
-- Badtux the Jap-bike-ownin' Penguin
All I wanted to do was install a simple wire harness and fuse block, not disassemble my bike! Oh well, at least I still have my KLR to ride to work tomorrow...
-- Badtux the Dissassembling Penguin
In my case, I was wanting to do two things for the Nightstrom -- protect the plastics, and have highway pegs. I have bad knees so the highway pegs were the biggy -- I can replace plastics, but replacing knees is a far more painful thought. So I looked around at the options, and decided what gave me the best protection for a reasonable price was the Givi crash guards for the Suzuki DL650 V-Strom. Then I could mount my Harley highway pegs to the thing, the kind meant to install on crashbars on a cruiser that I happened to have sitting on a box on the shelf, and voila!
So I put the Givi engine guards on, after waiting for a few weeks for a slow boat from Italy, and then tried to fit the highway pegs. No dice. If I put them where the bars were vertical, they were too high and too close to me. Further out and down, they were hidden under the arch where the engine guard wrapped upward around the plastics and my leg hit the up-bar.
So next thing I thought was an AMotostuff skid plate. Then I could put a Happy Trail highway peg bar intended to bolt to the skid plate of a Honda XR650 dual-sport to the AMotostuff skid plate, and voila. So I forked over another couple hundred bucks (eep!) for a skid plate. And mounted the highway peg bar to that, and... well, the skid plate is *rubber mounted* to reduce the force it puts onto the somewhat fragile bracket the rear mounts to, and my footpegs wobbled so much as to be practically useless!
I tried a few more options, and none of them worked. Finally I settled on a Pat Walsh Design motor guard and now have nice usable highway pegs, at the expense of less protection for my plastics. You've seen that setup further down the page.
So anyhow, what do you do with $350 worth of farkle that don't work for you? Well, that's easy -- you fleaBay it. So it's on its way to a new owner as we speak, and while I'm out some money, at least I'm not out $350 worth of money. The new owner doesn't care about highway pegs, he just wants protection for his plastics and the underside of his bike. So he gets what he wants, and I have what I need -- servicable highway pegs.
So today's lesson: Mistakes aren't the end of things. If you make a mistake and buy the wrong accessories for your bike, it's not the end of the world. Just fleaBay it, and then get what works for your bike. Maybe you'll be out a few bucks, but (shrug). So it goes, in motorcyclin' land.
-- Badtux the Farkle Penguin
So the first thing I'm going to do is put the battery on my Battery Tender when I get home tonight and let it charge for 24 hours. Then I can unplug the Battery Tender, let the bike sit for a few days, and check the battery charge by plugging the Battery Tender back in. If the Battery Tender does anything other than cut right off after a couple of minutes max, the battery has an internal short and needs replacing. Luckily since I have the Nightstrom, I don't need this bike to commute.
Oh, here's something to remember: When you're pissed because your motorcycle won't start, don't lean it over onto the sidestand without, uhm, putting the sidestand down first :-). The KLR fell over onto the Nightstrom. Luckily the topbag hit the Givi rack and stopped the KLR from falling over all the way, giving me the chance to swing my boot out from the other side of the KLR and push it back upright again. Then I pushed the KLR back to the front of the garage, backed the Nightstrom out of the garage, and rode the Nightstrom to work. Oh well!
-- Badtux the Motorcyclin' Penguin
Postscript: Yeppers, the battery is the problem. I took it off the Battery Tender once it went to maintain, put it back on again a couple of hours later, and it started charging again. The Battery Tender will, with a healthy fully-charged battery, do its red light, then start flashing its green light, then within a minute go to a steady green for "maintenance"... if the battery lost enough charge in two hours to stay in the 80% flashing mode for more than a minute or so, the battery has a short and is losing charge and needs to be replaced.
So why did I do this, when my Kawasaki KLR-650 has never darkened the interior of a dealer's door? Well, it's the stone age vs. the digital age. My KLR-650 is defiantly stone-age. It has one cylinder. The ignition has its own coil at the magneto and does not need the battery in any way to operate. It has a stone-age carburetor that is gravity-fed with no pumps or anything involved, as long as the bike is upright enough that the carb is below the gas petcock, the carb gets gas. If you kill the battery somehow, no problem -- just push-start the thing. The downside of course is that it makes about as much power as a riding lawn mower (34hp in actual dyno tests), has a top speed similar to a Ford Pinto, and gets fairly humdrum gas mileage for a 650cc motorcycle (around 40mpg).
But my new DL650 V-Strom is digital age all the way. You can't look up at the clocks and read off the odometer mileage when the bike is off. That's digital. You gotta turn the key on. You have a digital fuel gauge, digital temperature gauge, digital Antilock Braking System. The fuel pump is inside the gas tank and requires up to 40 watts of power to operate, and drives digital fuel injectors on digitally controlled throttle bodies. If you have no battery power you aren't going anywhere -- the injectors won't run, the fuel pump won't run, the stepper motors controlling the idle valves won't run, you're SOL. The upside is that you get 60 horsepower, a smooth power curve from idle to redline thanks to the oxygen sensor allowing the fuel injection to precisely map the fuel-air ratio at all throttle settings and RPM's, clean emissions thanks to the catalytic converter in the tailpipe, and even if you ride it fairly aggressively you still get 50mpg, and can get better if you keep your RPM's below 5,000 RPM (but that's boring!).
Now, for the most part I don't mind the fact that my Nightstrom is completely digital age. The upside is that it has tremendous power, excellent ridability, and gets great gas mileage. But one of the things required at 600 miles for a DL650 V-Strom in California is a throttle valve sync. And because idle is computer-controlled on the Nightstrom, this requires Suzuki's special computer to disable the computer-controlled idle and center the idle stepper motors on that computer-controlled throttle body. Then, and only then, can you adjust the idle air bypass screws so that a) each throttle body has equal vacuum and b) the bike is idling at the specified 1300 rpm when the idle stepper motors are centered. Anything else would be Just Wrong(tm).
See, here's the deal. Idle speed is controlled by the computer on this bike. There is a flap in each throttle body that allows more or less air to pass into the throttle body at idle. This flap is controlled by the idle stepper motor. When the bike is cold, the idle stepper motor will adjust the idle slightly upward at the same time that the injection system enrichens the mixture slightly. When you are at high altitude, again the idle stepper motor will adjust to give you slightly more air while the injectors lean out the mixture slightly (remember, we have an oxygen sensor down by the catalytic converter, so the injection system always knows how much fuel to inject to get ideal combustion).
So anyhow, under normal conditions, you want the idle stepper to be in the middle, so that it can open or close the idle air flaps as needed when conditions are *not* normal. Thus the need to use the special Suzuki computer to lock the idle stepper in the middle. If you try to adjust the idle air bypass screws without first locking the idle stepper in the middle, the computer will notice that you're giving a little more air to cylinder A that was showing more vacuum than cylinder B, and will tick the idle stepper downward to reduce the idle back down (since giving more air raised the idle to above 1300rpm). It is easily possible to get the idle stepper into such a position that it's no longer capable of adjusting idle. You can sorta compensate by giving a little less air to B at the same time as you give a little more air to A, which hopefully would avoid clicking the stepper, and I would do that if I was in the middle of Africa and didn't have Suzuki's special computer available to me, but there's no guarantees that this will keep the idle stepper centered when the bike is idling at 1300 rpm under normal conditions. The only guarantee is to use Suzuki's computer to lock the idle steppers in the center before you start twiddling the air screws.
So anyhow, that's the downside of the digital age: trips to the dealer (or potentially to an independent mechanic who happens to have that digital tool). Sigh. Computers. Talk about your love-hate relationship... I love the benefits of the thingies, but sometimes I do pine for the days of stone-age motorcycles where you didn't need much beyond a screwdriver, a big hammer, and a pair of pliers to fix pretty much anything. Luckily I have my KLR for when I'm pining for those days :-).
-- Badtux the Motorcyclin' Penguin
 Okay, here's the key:

Now, this all seems sorta overload. But all of these tools and supplies are pretty simple to use, and we're going to use most of them for the next part of the project. I'll show you what's what in actual action when we do that. So next, we get to install the fuse panel and then extend the wiring currently going up to the GPS to go to the fuse panel instead of directly to the battery. We are now entering into the meat of this project... but one where I take a big, BIG short-cut rather than do it all from scratch like I did the previous three times I did this project. You'll just have to wait and see to see what kind of short-cut I take, eh?
-- Badtux the Electrifying Penguin
Okay, first, why am I talking about wiring stuff up in the first place? Well, here's the deal. I have the following electrical gear that needs juice from my motorcycle:
Now, lots of folks, they get sorta panicky around electricity. They don't understand it, they don't want to understand it, so they won't. But really, it's pretty much bog simple. Your battery in your motorcycle or car has two poles on it, marked "+" and "-". Consider electricity to be a buncha little elves that march around in circles (we'll just call these elves "electrons", okay). You can imagine these elves marching out of the "+" pole on your battery, marching through your gizmo where they then spin the handles to make your air pump pump or whatever, then once they're all tired out they march out the other side of your gizmo to the "-" side of the battery. (Actually the electrons march from the "-" to the "+" but for historical reasons we pretend they march the other way, sorta like we pretend that we're civilized and shit like that).
So anyhow, everything electrical in a car or boat or motorcycle looks like this:
+ ------------GIZMO---------- -
Every gizmo has two wires. You got a wire from the "+" on your battery to the gizmo for your little energized ("voltage") elves to march through, then another wire from the gizmo to the "-" on the battery for the tired out elves, tired out from doing all that work in your gizmo, to march back out of until they can get re-energized in your battery. (Now note that this is not exactly how it works, but this is close 'nuff for your purposes :-).
Now I hear you saying, "but I have this gizmo that has only one wire going into it!" Well, if that's the case, that one wire goes to the "+". Then there's some stud or something which has to be hooked up to the "-" for the electron elves to march back out of. Because see, on older cars and motorcycles, rather than spend money running two wires, they just ran a wire from the "-" on the battery to the steel frame of the car or motorcycle. Then the tired elves just marched out of the tail light or whatever through the mounting bolts that held it to the back of your old Rambler, and marched through the steel frame of your car until they got back to the "-" on the battery. So there was two wires, but one was sorta implied, the second wire was the frame of your car or motorcycle.
But you definitely do not want to do that with any gizmo on a modern motorcycle that has an aluminum frame, because then you set up a galvanic current that causes corrosion where the aluminum hits steel (such as the steel of the bolts holding the engine to your frame, duh!). The result is that your frame rots to death. Instead, you want to run a wire all the way back to the "-" on your battery. So we need a way to distribute both the "+" and "-" to gizmos without having a jillion wires hooked to the battery. Something like, say, this Blue Sea fuse panel:
 See, you can run the "+" on the bottom to the "+ on the battery, and the "-" on the top to the "-" on the battery, then you can hook your gizmos up to the respective "+" terminals (on the bottom) and "-" terminals (on the top) of this fuse block, and voila! And aside from distribution, you get protection from short circuits also. Which is good. Because short circuits are bad.
So what's a short circuit? Well, remember, we had a wire that went like this:
+ ----------GIZMO--------- -
Our little electron elves marched out of the "+", did some work in the gizmo, then marched out to the "-". But a short circuit is when something melts down or connects so we end up with this instead:
+ ------------------------- -
Now our little electron elves march out of the "+", and lookie! Nothing to do! But they're just so full of energy and just want to work their little elve fingers off, so what do they do? Why, they make heat, that's what, as they march their merry little ways from point A to point B. Enough heat to make the insulation of the wiring melt and make things catch on fire. And remember, the battery of your motorcycle and a lot of its wiring is under your seat. Which, remember, is what your butt is sittin' on. OUCH! So anyhow, short circuits starting a fire is something we want to avoid just to preserve our butts, if ya know what I mean. Toasty buns are good only if yer eatin' hamburgers, not when you're riding your motorcycle!
So anyhow, that's what fuses are there to handle. Our little elves melt the fuse wires before they manage to heat up the rest of the wiring, the fuse wire breaks the circuit, our little electron elves no longer have a path to use to march from "+" to "-", so they don't. They just kinda stand around doing nothing, sorta like the five construction workers you see standin' around the one guy down in the hole diggin' like a mole. Which is fine and dandy, if we can't get any work from them by shippin' them through the GIZMO, they can stand around all they want, dig?
So anyhow, now you have the basics of motorcycle wiring. Yes, you do. It ain't rocket science, no matter what folks tell ya! So tomorrow I'm going to introduce you to the major tools needed for motorcycle electrical work, and then maybe we'll even get to play with some of those new toys I introduce you to. Don't worry, it'll be fun! For some definition of fun. That definition being more like, "damned tedious". It ain't rocket science, but it is a lot of fiddly work with skinny little wires, connectors, scissors, shrink-tubing, cranky crimpers, and so forth, all of which are put to the task at hand, which is getting those electrons to march from the "+" on the battery, through our gizmo, and finally to the "-" of the battery on the other side of the gizmo. So tune in for Motorcycle Wiring, Part 2 tomorrow!
-- Badtux the Electrifying Penguin
 The road up to Mount Hamilton has a number of hairpin turns, and is done mostly in 2nd gear on the 'Wee, with a few places (the 180 degree switchbacks) needing 1st gear. The road down the other side seems a bit less severe, or maybe it's just that you're going downhill. With the torque and power of a 650cc V-twin fed to pavement through a 150R17 radial rear tire, you rarely need to use any brakes on the downhill, unless you're trying for speed and trail braking. Me, I was enjoying the scenery (such as it was -- is chaparral scrub scenery?). The Weestrom is a predictably-handling bike and had no problem with the curvy road, but I didn't push it either -- pushing a motorcycle you're still learning on an unfamiliar highway is how you die.
Here is the 'Wee in all its glory with its new crash bars and highway pegs. It's wonderful what some rattlecan "satin black" will do, eh?
 Note how the skid plate reduces the already-limited ground clearance. This just goes to show that the V-Strom is not a dual-sport, no matter how Suzuki classifies it on its web site. Anyhow, I was still in very curvy and steep terrain here, mostly with no shoulder. This was the closest thing to level terrain I could find to stop. Here's another place I stopped:
 I almost got to test the crash bars here. The sidestand sunk about an inch into the soft tar of the shoulder. It was well over 90F outside, and I was stopping primarily to shove water into me (there was a bottle of water in the tank bag, which is also where the camera lived when I wasn't using it to take pictures of the bike, and there was two more bottles of water in the tailbag).
Somewhere around here, the GPS quit working altogether. I later examined the cable and found that a wire had pulled out of the plug because the screw holding the wire had come loose. A re-insertion of the wire and tightening the screw solved that problem. Here is a closer side view of the bike. You can see the sidestand starting to posthole...
 The GPS is the silver thing perched on the handlebar on the other side. You can also see the sheepskin on top of the gel seat. This is mostly to keep the sun from turning the seat into a torture instrument ("fried hueves, senor?"). Also note that I've used the aftermarket Madstad bracket to put the windshield down as far as it'll go and tilt back towards me as far as it'll go in an effort to get more air. At the top (Mount Hamilton) I ran into a guy on a Goldwing, he had air deflectors all over the place to try to get some air back into that stable bubble behind a Goldwing's massive windshield. The 'Wee doesn't put as much air on me as the KLR does even with the windshield at its lowest/tilted most position, but it was enough.
After about 60 miles more of curvy road, I arrived at I-5 and headed towards Altamont Pass to get back home on the 'slab. At first I was relaxing, feet on the highway pegs. It was like sitting in an easy chair. The only thing I needed then was a backrest and I would have been completely relaxed. Then the first gust of air from the west hit me -- the winds from Altamont Pass, hitting me from the side. I adjusted the windshield further up and tilted it a little more forward to give me more wind protection, but it didn't help much. Heading crosswise towards the pass, I was getting constantly pounded from the side by the air coming through the pass. It felt like it was gonna rip my helmet off the side of my head! Through it all, the Blackstrom happily chugged straight ahead at 80mph indicated on the speedometer, not breathing hard even on the uphills. Even heading up over the pass straight into the teeth of the gale, the 'strom had no problem maintaining speed without downshifting. 70hp for a 500 pound bike (with 200 pounds of rider and gear on board) simply laughs at such grades and winds.
For the rest... (shrug). I've ridden this route often enough that I don't need the GPS, lucky me because the GPS still wasn't working. I got home, and considered what I'd learned. What I'd learned was this:
-- Badtux the Motorin' Penguin

 But that was before I put on the crash bars last night and the highway pegs this morning and the Fenda Extenda this afternoon. I also changed out the oil again to see how breakin was coming along. Apparently quite fine, there was no residue in the oil and very little "fuzz" on the magnetic drain plug. I put Shell Rotella T 15W40 into the crankcase, yes that is an allowed fill according to the owner's manual and I know from experience and other peoples' oil analysis tests that it's a good oil.
Now all that's left is to put on the automatic chain oiler, the electronic cruise control, and the heated grips, and then she's ready for a trans-continental trip. Yes, I have all the parts for this, including a new fusebox and associated relay and plugs and such, but I'm dreading the electrical parts of this project. Not because they're hard, mind you. Rather, because they're tedious. Doing electrical wiring right is a major chore, and if you don't do it right, then Lucas electrics seem reliable...
-- Badtux the (soon to be) Electrifying Penguin
Okay, first a digression: buy a set of torque wrenches, and use them. Don't gimme that crap about how you have been wrenchin' fer forty years and you know the right torque by "feel". It's bullshit. I can "feel" the right torque if I just used a torque wrench on a bolt and torqued it to the exact same torque from the same moment arm, otherwise I'm like every other wrench on this planet -- I overtorque small bolts, and undertorque big'uns. My use of torque wrenches tends to bear that out -- my torque wrench always clicks long before I think the bolt is "tight enough" on small bolts, and on large bolts I'm always sayin', "is this damned torque wrench gonna ever friggin' click? Is it broken or somethin'?" Of course it ain't. I just haven't torqued the big bolt enough yet.
My recommendations for torque wrenches: Sears "click" types. First of all, you can get'em calibrated by Sears Roebuck & Company, though if you properly care for them by putting them away in their cases with the dial set to zero between uses, they generally don't need calibrating more than every five years or so. These make a little "click" noise when you reach the set torque. You may not be able to see a dial or lever when your ass is buried deep under a car hood, but you can damn well hear the "click". Furthermore, get a set. I got a little inch pounds one, a medium-sized one that goes to about 50 foot-pounds, then a big'un that goes all the way to 150 ft/lbs. Deal is that big torque wrenches are no good at the low end of their scale, they're just not very accurate down there, so you need small torque wrenches to handle those. But when you're torquing lug nuts to 100 ft/lbs (gotta do it evenly so that you don't warp the brake rotor)1, you damn well need that big friggin' wrench. And yeah, they're expensive. So what. Don't buy cheap tools, that's how ya get busted knuckles. (Sorry, Ornery Bastard, had to steal yer tag line there).
Anyhow, back to the thread repair. What kind of thread repair you use depends on what you're fixing. Me, I'm going to take that cross-member that I broke a bolt off in the other day, drill that bolt out of there, and then put a thread repair coil in there. If it was a spark plug hole or a brake cylinder bleeder hole I'd use something different -- a Timesert, which is a solid repair that won't leak like a Heli-coil or its clones. But for a general frame tube that's expensive overkill. Anyhow, here's a Heli-coil kit, a Makita drill, a bench vise, and a left-handed drill bit for drilling out a bolt broke off in a hole:
 Now, one thing you'll find out, pricing thread repair kits, is that they're expensive. The good part is that you can re-use them and just buy coils. That particular Heli-coil kit is so old that the packaging has yellowed, but the tap and insert in it work just fine. As for the Makita drill, a word of advice -- have a second fully-charged battery available if you're using a battery-powered drill. This is my only drill that will hold a 31/64 drill bit (needed for the Heli-coil kit), so that's what I gotta use. Finally, it's a lot easier to work on a piece if you can get it up on your bench. Obviously that won't work if you're working on the frame of a car, but here I took a bit of inner tube and stuck that frame tube on my bench and started drilling, first punching a small indention with a punch then drilling like my life depended on it:
 Until finally, I drilled all the way through:
 Once through, I moved up one drill bit size at a time until I was up to the size specified on the Heli-coil packaging, then tapped new threads into it to wind the Heli-coil into. Note: I used the can of cutting oil in the pump can below the bench to lubricate the tap, those things are expensive ($55 for a Helicoil kit nowdays, and most of that is for the tap!). Said cutting oil actually being 80w gear oil :-). Note that I'm using a high-tech tap wrench on this tap, but you'll see a "real" tap wrench later:
 Once the hole is threaded, then you put the coil on its inserter so that the tang is resting against its end:
 And then screw it into the hole using the inserter and a tap wrench (from my tap and die set, duh).
 Until finally it's all the way in!
 And then you have to break off the tang on the bottom using a punch and a hammer. Luckily I have a punch set from Cheap Chinese Tool Company in the second drawer from the top of my rightmost tool chest-of-drawers (which used to be a bedroom chest-of-drawers before I retired its ugly ass to the garage). One whack with the hammer, and the tang was history. And now the end result:
 Yay, my (replacement) bolt screws in! And now I'm ready to put this cross-member back on the bike until its replacement gets here. Beats bein' out of commission for a week!
-- Badtux the Wrenchin' Penguin
